Real-time data is the backbone of modern financial applications. Whether you’re tracking cryptocurrency prices, monitoring stock market fluctuations, or building a trading dashboard, the ability to push live updates to users without constant page refreshes is essential.

In this comprehensive tutorial, we’ll build a real-time stock market bot using ASP.NET Core and SignalR. By the end of this guide, you’ll have a fully functional application that fetches stock prices and broadcasts live updates to all connected clients instantly.
SignalR is a powerful library that simplifies adding real-time web functionality to your .NET applications. It handles the complexity of maintaining persistent connections between server and client, automatically falling back from WebSockets to other transport methods when needed.
What you’ll learn:
- Setting up an ASP.NET Core project with SignalR
- Creating a background service to fetch stock data
- Broadcasting real-time updates to multiple clients
- Building a responsive frontend that displays live stock prices

Let’s dive in! 🚀
Prerequisites & Tools
Before we begin, make sure you have the following installed:
Required:
- .NET 8 SDK (download from dotnet.microsoft.com)
- Visual Studio 2022 or Visual Studio Code with C# extension
- Basic C# knowledge and familiarity with ASP.NET Core concepts
Optional:
- A stock market API key (we’ll use Alpha Vantage’s free tier, or you can use mock data)
- Node.js (if you want to use npm packages for the frontend)
Helpful but not required:
- Understanding of WebSockets and HTTP communication
- Experience with JavaScript and DOM manipulation
Setting Up the Project
Let’s create our ASP.NET Core web application from scratch.
Step 1: Create a New Project
Open your terminal and run:
dotnet new web -n StockMarketBot
cd StockMarketBot
This creates a minimal ASP.NET Core web application. We’re starting with a clean slate to understand exactly what we’re building.
Step 2: Install SignalR
SignalR is included in ASP.NET Core, but we need to add it to our project. Run:
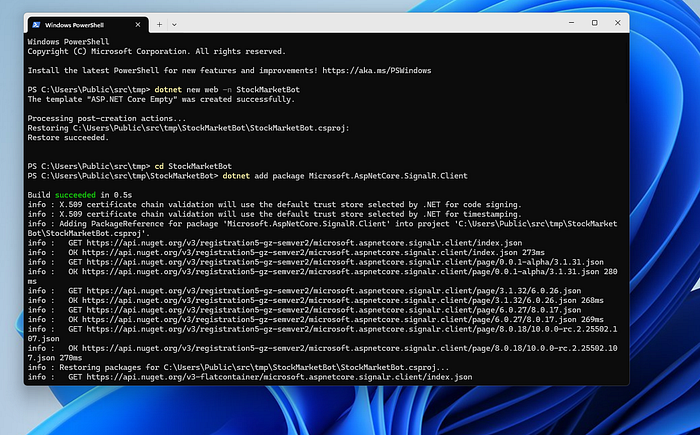
dotnet add package Microsoft.AspNetCore.SignalR.Client
Step 3: Setup Project Structure
Create the following folder structure:
StockMarketBot/
├── Hubs/
│   └── StockHub.cs
├── Services/
│   └── StockService.cs
├── Models/
│   └── StockData.cs
├── wwwroot/
│   ├── index.html
│   └── js/
│       └── stock.js
└── Program.cs
You can create these folders using:
mkdir Hubs Services Models wwwroot wwwroot/js
This organization keeps our code clean and maintainable, separating concerns between real-time communication (Hubs), business logic (Services), data models (Models), and frontend assets (wwwroot).
Creating the Data Model
First, let’s define what our stock data looks like.
Models/StockData.cs
namespace StockMarketBot.Models
{
    public class StockData
    {
        public string Symbol { get; set; } = string.Empty;
        public decimal Price { get; set; }
        public decimal Change { get; set; }
        public decimal ChangePercent { get; set; }
        public DateTime Timestamp { get; set; }
        public string Status { get; set; } = "active"; // active, rising, falling
    }
}
This model represents a single stock update with essential information: the ticker symbol, current price, price change, and a timestamp. The Status property helps us add visual indicators in the UI.
Fetching Live Stock Data
Now let’s create a service that simulates fetching stock data. In a production environment, you’d connect to a real API like Alpha Vantage, IEX Cloud, or Finnhub.
Services/StockService.cs
using StockMarketBot.Models;

namespace StockMarketBot.Services
{
    public class StockService : BackgroundService
    {
        private readonly ILogger<StockService> _logger;
        private readonly IHubContext<StockHub> _hubContext;
        private readonly List<string> _stockSymbols = new()
        {
            "AAPL", "GOOGL", "MSFT", "AMZN", "TSLA", "META", "NVDA", "NFLX"
        };
        private readonly Dictionary<string, decimal> _lastPrices = new();
        private readonly Random _random = new();

        public StockService(
            ILogger<StockService> logger,
            IHubContext<StockHub> hubContext)
        {
            _logger = logger;
            _hubContext = hubContext;

            // Initialize with base prices
            foreach (var symbol in _stockSymbols)
            {
                _lastPrices[symbol] = _random.Next(50, 500);
            }
        }

        protected override async Task ExecuteAsync(CancellationToken stoppingToken)
        {
            _logger.LogInformation("Stock Service started");

            while (!stoppingToken.IsCancellationRequested)
            {
                try
                {
                    // Generate stock updates
                    var stockUpdates = GenerateStockUpdates();

                    // Broadcast to all connected clients
                    await _hubContext.Clients.All
                        .SendAsync("ReceiveStockUpdate", stockUpdates, stoppingToken);

                    // Wait 2 seconds before next update
                    await Task.Delay(2000, stoppingToken);
                }
                catch (Exception ex)
                {
                    _logger.LogError(ex, "Error in Stock Service");
                }
            }
        }

        private List<StockData> GenerateStockUpdates()
        {
            var updates = new List<StockData>();

            foreach (var symbol in _stockSymbols)
            {
                // Generate realistic price movement (-2% to +2%)
                var changePercent = (_random.NextDouble() - 0.5) * 4;
                var lastPrice = _lastPrices[symbol];
                var change = lastPrice * (decimal)(changePercent / 100);
                var newPrice = lastPrice + change;

                // Update stored price
                _lastPrices[symbol] = newPrice;

                // Determine status
                var status = change > 0 ? "rising" : change < 0 ? "falling" : "active";

                updates.Add(new StockData
                {
                    Symbol = symbol,
                    Price = Math.Round(newPrice, 2),
                    Change = Math.Round(change, 2),
                    ChangePercent = Math.Round((decimal)changePercent, 2),
                    Timestamp = DateTime.UtcNow,
                    Status = status
                });
            }

            return updates;
        }
    }
}
What’s happening here?
The StockService is a hosted background service that runs continuously. Every 2 seconds, it generates realistic stock price fluctuations and broadcasts them through SignalR. The IHubContext<StockHub> allows us to send messages to connected clients from outside the Hub class itself.
In a real application, you’d replace GenerateStockUpdates() with API calls to a stock data provider.
Broadcasting Real-Time Updates with SignalR
The Hub is where the magic happens. It’s the central point for real-time communication between server and clients.
Hubs/StockHub.cs
using Microsoft.AspNetCore.SignalR;
using StockMarketBot.Hubs;
using StockMarketBot.Models;

namespace StockMarketBot.Hubs
{
    public class StockHub : Hub
    {
        private readonly ILogger<StockHub> _logger;

        public StockHub(ILogger<StockHub> logger)
        {
            _logger = logger;
        }

        public override async Task OnConnectedAsync()
        {
            _logger.LogInformation($"Client connected: {Context.ConnectionId}");
            await Clients.Caller.SendAsync("Connected", Context.ConnectionId);
            await base.OnConnectedAsync();
        }

        public override async Task OnDisconnectedAsync(Exception? exception)
        {
            _logger.LogInformation($"Client disconnected: {Context.ConnectionId}");
            await base.OnDisconnectedAsync(exception);
        }

        // Clients can subscribe to specific stocks
        public async Task SubscribeToStock(string symbol)
        {
            await Groups.AddToGroupAsync(Context.ConnectionId, symbol);
            _logger.LogInformation($"Client {Context.ConnectionId} subscribed to {symbol}");
        }

        // Clients can unsubscribe from stocks
        public async Task UnsubscribeFromStock(string symbol)
        {
            await Groups.RemoveFromGroupAsync(Context.ConnectionId, symbol);
            _logger.LogInformation($"Client {Context.ConnectionId} unsubscribed from {symbol}");
        }
    }
}
The Hub manages connections, disconnections, and provides methods that clients can invoke. The group functionality allows clients to subscribe to specific stocks, though in our example we’ll broadcast all updates to everyone.
SignalR handles all the complexity of maintaining persistent connections, automatic reconnection, and scaling across multiple servers if needed.
Configuring Program.cs
Now let’s wire everything together in our application startup.
Program.cs
using StockMarketBot.Hubs;
using StockMarketBot.Services;

var builder = WebApplication.CreateBuilder(args);

// Add SignalR
builder.Services.AddSignalR();

// Add our background service
builder.Services.AddHostedService<StockService>();

// Enable static files (for our HTML/JS)
builder.Services.AddCors(options =>
{
    options.AddDefaultPolicy(policy =>
    {
        policy.AllowAnyOrigin()
              .AllowAnyHeader()
              .AllowAnyMethod();
    });
});

var app = builder.Build();

// Enable static files
app.UseDefaultFiles();
app.UseStaticFiles();

// Enable CORS
app.UseCors();

// Map SignalR Hub
app.MapHub<StockHub>("/stockhub");

app.Run();
This configuration:
- Registers SignalR services
- Adds our background stock service
- Enables serving static files (HTML, CSS, JS)
- Maps our SignalR Hub to the
/stockhubendpoint - Configures CORS for development (restrict this in production!)
Building the Frontend
Let’s create a clean, responsive interface that displays real-time stock updates.
wwwroot/index.html
<!DOCTYPE html>
<html lang="en">
<head>
    <meta charset="UTF-8">
    <meta name="viewport" content="width=device-width, initial-scale=1.0">
    <title>Real-Time Stock Market Bot 📈</title>
    <style>
        * {
            margin: 0;
            padding: 0;
            box-sizing: border-box;
        }

        body {
            font-family: 'Segoe UI', Tahoma, Geneva, Verdana, sans-serif;
            background: linear-gradient(135deg, #667eea 0%, #764ba2 100%);
            min-height: 100vh;
            padding: 20px;
        }

        .container {
            max-width: 1200px;
            margin: 0 auto;
        }

        header {
            text-align: center;
            color: white;
            margin-bottom: 30px;
        }

        h1 {
            font-size: 2.5rem;
            margin-bottom: 10px;
        }

        .status {
            display: inline-block;
            padding: 8px 16px;
            border-radius: 20px;
            font-size: 0.9rem;
            margin-top: 10px;
        }

        .status.connected {
            background: #10b981;
            color: white;
        }

        .status.disconnected {
            background: #ef4444;
            color: white;
        }

        .stock-grid {
            display: grid;
            grid-template-columns: repeat(auto-fit, minmax(280px, 1fr));
            gap: 20px;
            margin-top: 30px;
        }

        .stock-card {
            background: white;
            border-radius: 12px;
            padding: 24px;
            box-shadow: 0 4px 6px rgba(0, 0, 0, 0.1);
            transition: transform 0.2s, box-shadow 0.2s;
        }

        .stock-card:hover {
            transform: translateY(-4px);
            box-shadow: 0 8px 12px rgba(0, 0, 0, 0.15);
        }

        .stock-card.rising {
            border-left: 4px solid #10b981;
        }

        .stock-card.falling {
            border-left: 4px solid #ef4444;
        }

        .stock-symbol {
            font-size: 1.5rem;
            font-weight: bold;
            color: #1f2937;
            margin-bottom: 12px;
        }

        .stock-price {
            font-size: 2rem;
            font-weight: bold;
            color: #111827;
            margin-bottom: 8px;
        }

        .stock-change {
            font-size: 1.1rem;
            font-weight: 600;
            display: flex;
            align-items: center;
            gap: 8px;
        }

        .stock-change.positive {
            color: #10b981;
        }

        .stock-change.negative {
            color: #ef4444;
        }

        .timestamp {
            font-size: 0.85rem;
            color: #6b7280;
            margin-top: 12px;
        }

        .pulse {
            animation: pulse 0.5s ease-in-out;
        }

        @keyframes pulse {
            0%, 100% { transform: scale(1); }
            50% { transform: scale(1.05); }
        }
    </style>
</head>
<body>
    <div class="container">
        <header>
            <h1>📈 Real-Time Stock Market Bot 💹</h1>
            <p>Live stock prices powered by SignalR</p>
            <div id="connectionStatus" class="status disconnected">Disconnected</div>
        </header>

        <div id="stockGrid" class="stock-grid">
            <!-- Stock cards will be dynamically inserted here -->
        </div>
    </div>

    <script src="https://cdnjs.cloudflare.com/ajax/libs/microsoft-signalr/8.0.0/signalr.min.js"></script>
    <script src="js/stock.js"></script>
</body>
</html>
wwwroot/js/stock.js
const connection = new signalR.HubConnectionBuilder()
    .withUrl("/stockhub")
    .withAutomaticReconnect()
    .build();

// Start connection
async function start() {
    try {
        await connection.start();
        console.log("SignalR Connected");
        updateConnectionStatus(true);
    } catch (err) {
        console.error("Error connecting to SignalR:", err);
        updateConnectionStatus(false);
        setTimeout(start, 5000); // Retry after 5 seconds
    }
}

// Update connection status UI
function updateConnectionStatus(isConnected) {
    const statusElement = document.getElementById('connectionStatus');
    if (isConnected) {
        statusElement.textContent = '● Connected';
        statusElement.className = 'status connected';
    } else {
        statusElement.textContent = '● Disconnected';
        statusElement.className = 'status disconnected';
    }
}

// Handle incoming stock updates
connection.on("ReceiveStockUpdate", (stockUpdates) => {
    const stockGrid = document.getElementById('stockGrid');

    stockUpdates.forEach(stock => {
        let card = document.getElementById(`stock-${stock.symbol}`);

        if (!card) {
            // Create new card
            card = createStockCard(stock);
            stockGrid.appendChild(card);
        } else {
            // Update existing card
            updateStockCard(card, stock);
        }
    });
});

// Create a new stock card
function createStockCard(stock) {
    const card = document.createElement('div');
    card.id = `stock-${stock.symbol}`;
    card.className = `stock-card ${stock.status}`;
    card.innerHTML = `
        <div class="stock-symbol">${stock.symbol}</div>
        <div class="stock-price">$${stock.price.toFixed(2)}</div>
        <div class="stock-change ${stock.change >= 0 ? 'positive' : 'negative'}">
            <span>${stock.change >= 0 ? '▲' : '▼'}</span>
            <span>$${Math.abs(stock.change).toFixed(2)} (${stock.changePercent.toFixed(2)}%)</span>
        </div>
        <div class="timestamp">Updated: ${new Date(stock.timestamp).toLocaleTimeString()}</div>
    `;
    return card;
}

// Update existing stock card
function updateStockCard(card, stock) {
    card.className = `stock-card ${stock.status} pulse`;
    setTimeout(() => card.classList.remove('pulse'), 500);

    card.querySelector('.stock-price').textContent = `$${stock.price.toFixed(2)}`;

    const changeElement = card.querySelector('.stock-change');
    changeElement.className = `stock-change ${stock.change >= 0 ? 'positive' : 'negative'}`;
    changeElement.innerHTML = `
        <span>${stock.change >= 0 ? '▲' : '▼'}</span>
        <span>$${Math.abs(stock.change).toFixed(2)} (${stock.changePercent.toFixed(2)}%)</span>
    `;

    card.querySelector('.timestamp').textContent =
        `Updated: ${new Date(stock.timestamp).toLocaleTimeString()}`;
}

// Handle reconnection
connection.onreconnecting(() => {
    console.log("SignalR Reconnecting...");
    updateConnectionStatus(false);
});

connection.onreconnected(() => {
    console.log("SignalR Reconnected");
    updateConnectionStatus(true);
});

connection.onclose(() => {
    console.log("SignalR Disconnected");
    updateConnectionStatus(false);
    setTimeout(start, 5000);
});

// Start the connection
start();
Key features of the frontend:
- Automatic connection management with retry logic
- Real-time card updates with smooth animations
- Visual indicators for rising/falling stocks
- Color-coded price changes (green for positive, red for negative)
- Responsive grid layout that adapts to different screen sizes
- Connection status indicator
Testing and Running the Bot
Now let’s see our stock bot in action!
Step 1: Build and Run
In your terminal or using Visual Studio, execute/run:
dotnet build
dotnet run
You should see output like:
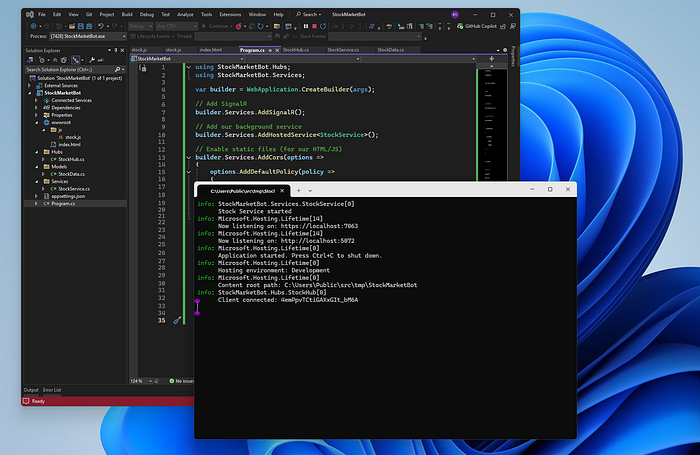
info: StockMarketBot.Services.StockService[0]
      Stock Service started
info: Microsoft.Hosting.Lifetime[14]
      Now listening on: https://localhost:7063
info: Microsoft.Hosting.Lifetime[14]
      Now listening on: http://localhost:5072
info: Microsoft.Hosting.Lifetime[0]
      Application started. Press Ctrl+C to shut down.
info: Microsoft.Hosting.Lifetime[0]
      Hosting environment: Development
info: Microsoft.Hosting.Lifetime[0]
      Content root path: C:\Users\Public\src\tmp\StockMarketBot
info: StockMarketBot.Hubs.StockHub[0]
      Client connected: 4emPpvTCtiGAXxGIt_bM6A
Step 2: Open Your Browser
Navigate to https://localhost:7063 (or whatever port is displayed).
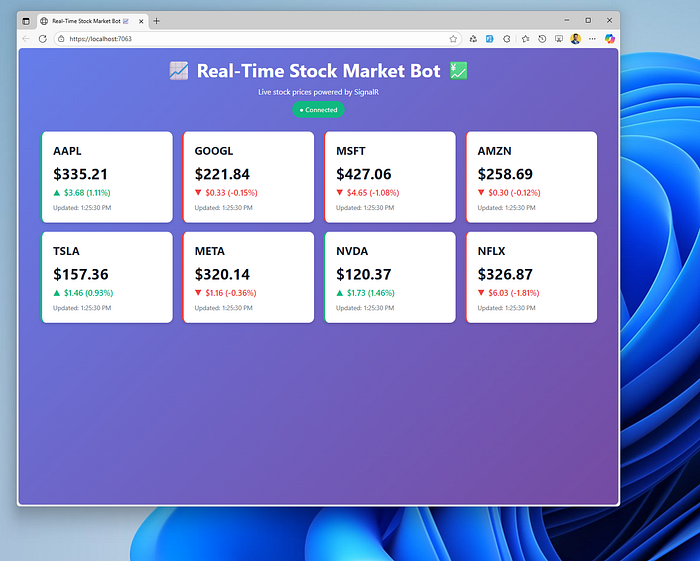
You should see:
- The connection status change from “Disconnected” to “Connected”
- Stock cards appearing on the screen
- Prices updating every 2 seconds
- Visual indicators (green/red borders) showing which stocks are rising or falling
- Smooth pulse animations when cards update
Step 3: Test Multiple Clients
Open multiple browser tabs or windows pointing to the same URL. All clients will receive synchronized updates in real-time. This demonstrates SignalR’s ability to broadcast to multiple connected clients simultaneously.
Debugging Tips
If something isn’t working:
- Check the browser console for JavaScript errors
- Review server logs for SignalR connection issues
- Verify SignalR is properly configured in Program.cs
- Ensure port 5000 isn’t blocked by firewall
- Check that all files are in the correct folders
Common issues:
- 404 on /stockhub: SignalR endpoint not mapped correctly
- Connection fails: CORS policy might be blocking the connection
- No updates: Background service might not be running
Deploying Your Stock Bot
Ready to deploy? Here are your options:
Azure App Service
dotnet publish -c Release
# Deploy to Azure using Azure CLI or Visual Studio
Docker
Create a Dockerfile:
FROM mcr.microsoft.com/dotnet/aspnet:8.0 AS base
WORKDIR /app
EXPOSE 80

FROM mcr.microsoft.com/dotnet/sdk:8.0 AS build
WORKDIR /src
COPY ["StockMarketBot.csproj", "./"]
RUN dotnet restore
COPY . .
RUN dotnet build -c Release -o /app/build

FROM build AS publish
RUN dotnet publish -c Release -o /app/publish

FROM base AS final
WORKDIR /app
COPY --from=publish /app/publish .
ENTRYPOINT ["dotnet", "StockMarketBot.dll"]
Build and run:
docker build -t stock-bot .
docker run -p 8080:80 stock-bot
Production Considerations:
- Configure proper CORS policies (don’t use AllowAnyOrigin)
- Add authentication if needed
- Use Azure SignalR Service for scaling beyond a single server
- Implement rate limiting for API calls
- Add error tracking (Application Insights, Sentry)
- Use HTTPS in production
Enhancing Your Stock Bot
Now that you have a working real-time stock bot, here are some exciting ways to extend it:
1. Real Stock Data Integration Replace the mock data with actual APIs:
- Alpha Vantage (free tier available)
- IEX Cloud
- Finnhub
- Yahoo Finance API
2. Price Alerts Add notifications when stocks hit certain thresholds:
public async Task SetPriceAlert(string symbol, decimal targetPrice)
{
    // Store alert in database
    // Trigger notification when price crosses threshold
}
3. Historical Charts Integrate Chart.js or Recharts to visualize price history over time.
4. User Portfolios Let users track their favorite stocks:
- Add authentication (ASP.NET Core Identity)
- Store watchlists in a database
- Calculate portfolio value in real-time
5. Machine Learning Predictions Use ML.NET to add predictive features:
- Price forecasting
- Trend analysis
- Anomaly detection
6. Mobile App Build a Xamarin or .NET MAUI mobile app that connects to the same SignalR hub.
7. Trading Simulation Add paper trading functionality to let users practice without real money.
✍️Wrapping Up
Congratulations! 🎉 You’ve built a fully functional real-time stock market bot using ASP.NET Core and SignalR.
What we accomplished:
- Created a scalable real-time web application
- Implemented a background service to simulate stock data
- Used SignalR to broadcast live updates to multiple clients
- Built a responsive, animated frontend
- Learned how to handle persistent connections efficiently
SignalR abstracts away the complexity of real-time communication, letting you focus on building amazing features. The patterns you’ve learned here apply to countless real-time scenarios: chat applications, live dashboards, multiplayer games, collaborative editing tools, and more.
The financial technology space is constantly evolving, and real-time data processing is at its core. Whether you’re building trading platforms, monitoring systems, or analytics dashboards, the skills you’ve learned today are incredibly valuable.
Next steps:
- Connect to a real stock market API
- Add user authentication and personalization
- Implement advanced features like alerts and predictions
- Deploy to production and scale with Azure SignalR Service
- Explore other SignalR features like streaming and group messaging
Remember, the key to mastering these technologies is experimentation. Take this foundation and build something unique. Try breaking things, fixing them, and adding your own creative features.
If you found this guide helpful, consider following me for more .NET and web development tutorials! I regularly share deep dives on ASP.NET Core, SignalR, Azure, and modern web technologies. Drop a comment below with what you built or what features you’d like to see next! 💻✨
👋Ultimate Collection of .NET Web Apps for Developers and Businesses
🚀 My YouTube Channel
💻 Github
Here are three ways you can help me out:
Please drop me a follow →👍 R M Shahidul Islam Shahed
Receive an e-mail every time I post on Medium → 💌 Click Here
Grab a copy of my E-Book on OOP with C# → 📚 Click Here
Tags
.NET SignalR ASP.NET Core C# Real-Time Apps Web Development Stock Market Programming Developers Software Engineering Tutorial WebSockets Backend Development